Step 1:
Save these assets:


Step 2:
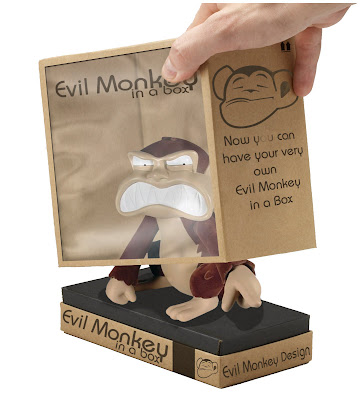
Use the clone tool and spot healing brush yo clean the box of all the markings except the brown square on the bottom right side of the box. This doesn't have to be perfect. Label this layer Box.
Use the clone tool and spot healing brush yo clean the box of all the markings except the brown square on the bottom right side of the box. This doesn't have to be perfect. Label this layer Box.
Step 3:
Use the magic wand to separate the box from the background replacing it with a plain white background on a separate layer. Label this layer BG.
Create a duplicate box layer, then turn the layer off.
Step 4:
To create the clear plastic front, use the polygonal lasso tool. You can use guides to help with this but I found it simpler to just eyeball it. You'r going to cut the thumb off but don't worry, that's what the duplicate layer is for.
Once satisfied with your selection, press the delete key.
To create the interior of the box we are going to use the side of the top box. Use the polygonal lasso tool to make a selection on the side of the box, you won't be able to select the whole thing because of the hand, but that's okay just make it as large as you can.
Making sure the original box layer is selected, press CRTL C to create a copy then press CRTL V to paste the selection into a new layer. Duplicate this new layer once. Label these new layers inside 1 and inside 2, hide inside 1 for now.
Move inside 2 so it covers the right half of the original box image. Adjust the image as needed.
Make inside 1 visible and again and move it so it covers the other half of the original box image, be sure to line up the layers so there is a distinct vertical seam. Once satisfied select both inside layers and then press CTRL E to merge them into a one layer.
Step 6:
Use the Burn tool to darken the edges and the seam between the your new interior layer. don't worry if it's not perfect. Use the Blur tool to clean up any area's then need it.
Step 7:
To create the plastic front. Select the original Box layer then use the magic wand to select the inside. Create a new layer, call it plastic, then fill the new layer with white, dropping the opacity down to 20%. Double click on the plastic layer to open the layer style dialog box. Check the pattern overlay box. Select the satin pattern (append the list if necessary, satin is part of pattern list). Increase the scale to 1000% and the Opacity down to 50%
Make the duplicate copy of the box layer visible again and start erasing everything but what's around the thumb. I find it easier to do this if I turn off the original box layer initially.
Once the bulk of the layer been deleted, turn back on the original box layer, making sure you erasier hardness is set to around 80%. clean up around the the thumb. Make sure you leave the shadow beneath the thumb.
When that's done, drop the opacity of the eraser to about 25% and lesson some of the shadow from around the thumb.
Step 9:
Make a new layer and label this one glare, place it just above the plastic layer.
Select the rectangular marquee tool, in the feather box, type in 30 px.
Create a rectangle near the bottom of the box
Fill this selection using the gradient tool, use white to transparent
Duplicate the glare layer and move it to the top, rotating the layer to align with the top
That's it for the box, you can now fill it with anything you'd like.
---------------------------------------------------------------------------
To fill the box with our Evil Monkey.
Step 11.
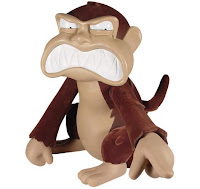
Open the Monkey doll image in photoshop. Use the Magic want to select the white background around the monkey and delete. Then move the monkey to our working image.
Back in our working image, we need to split the box into separate layers, so using the polygonal lasso tool, select the top part of the box and press CTRL X then CTRL V to paste it into a new layer. Label these layers box top and box bottom
Move the Box bottom layer so it's beneath the new monkey layer and position the monkey so it's looks like it fits inside the box.

Step 12.
Create a new layer beneath the monkey layer and label it shadow.
Select the brush tool, size 60, hardness of 80%, color black.
Once your satisfied with the look, drop the opacity of the shadow layer to about 30%.
Step 13:
Adding the Text:
I used font Bimini, you can get the font here: http://www.fontyukle.net/en/1,bimini
Select the eyedropper tool and select a sample color from the brown color swatch the we left on the right side of the box bottom. Use this color as the color for the font and the monkey logo.
Select the font tool and type out "Evil monkey", Rasterize the type. Select the font tool again and type out "in a box", rasterize the type. Resize "Evil Monkey" so it as wide as the box. Resize the "in a box" so it sits between the "o" and the y of "Monkey". Hold the CTRL while selecting both text layers and then Press CTRL E to merge these two layers together, label the layer Evil Monkey and duplicate, then turn off the copy.
No we want to warp the text just a bit where the thumb is pressing into the plastic layer.
Select the Evil Monkey layer and go the edit menu, go to the transform and select warp.
Move the right side of the text in just a bit then move the text under the thumb up or down just a bit to create a slight bump.
Step 14:
Make visible the duplicate Evil Monkey layer and move the text so its lined up with the bottom of the box. Use the rotate tool, perspective and distort tools to adjust the layer so it's fits on the bottom box.
Select the font tool again and type your name or company name, rasterize the layer, using the rotate tool, perspective, and distort tool to adjust the layer so it's fits along the side of the box.
You can see how the Evil Monkey is not quite vertical. The warp tool comes in handy to correct this problem.
Select the text tool again and type "Now you can have your very own Evil Monkey in a Box", rasterize the text. Using the rotate, perspective and distort tools, adjust the layer to fit on the side of the box. Keep the layer about halfway down the side of the box.
Use the Burn and doge tools to just slightly lighten and darken the text.
Step 15:
To add the Monkey logo to the lower right corner and the upper right corner, open in photoshop the monkey face logo. Use the magic wand to select the light brown and white background colors. To select more than on area, hold down the CTRL Key down. Once selected, press the delete key to remove these two colors. Once deleted, go to the Select menu and select inverse. Then go to the edit menu and select fill. Fill the selection with the same color as your font. Label this layer Monkey Logo
Drag this new image over to our working image.
Duplicate the layer once. Select one of the images and resize the image smaller. Adjust the image so it fits in the small square on the right hand side of the bottom box.
Once your satisfied, that it's your done.
Thanks.
Nathan White


No comments:
Post a Comment