
Step 1:
We need to collect our resources so goto the links provided and download the assets.
1. http://www.cgtextures.com/texview.php?id=31399&PHPSESSID=dbd778278efd0506b481b12273101026
download image 5 in this set.
2. http://www.cgtextures.com/texview.php?id=12880&PHPSESSID=dbd778278efd0506b481b12273101026
download image 1 in this set
3. http://www.lightingdirect.com/index.cfm?page=product:mediaGallery&uniqueId=1152278
Save this image.
4. http://skulpt.deviantart.com/art/Holes-Holes-Holes-62550652
Download this Photoshop brush and install in your presets folder.
5. http://www.allfreebrush.com/html/Brushes/Vintage/200908/06-1893.html
Download and install this brush in you preset folder.
6. http://www.blirk.net/wallpapers/1400x1050/nature-wallpaper-237.jpg
Step 2:
Create a new document in Photoshop that is 1200 X 800 and 300 dpi
Open the two wood texture we downloaded earlier.


Crop just the rusted metal from the planks and isolated the log from it's background.
Drag these two assets onto our working image.
Create the billboard shape by duplicating the assets, flip vertical and horizontal to create some variety.
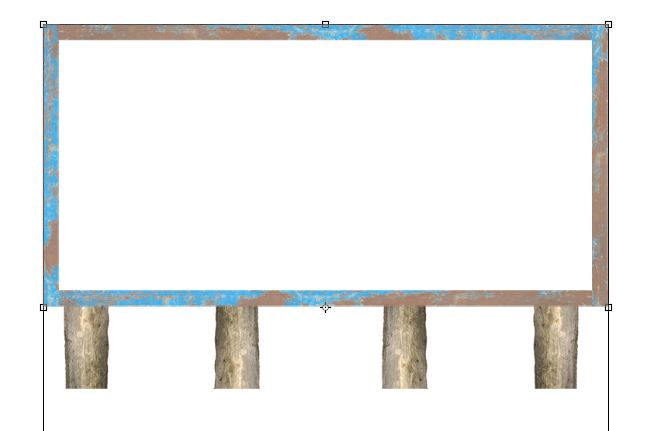
Then add a drop shadow to just the Billboard frame.

Step 3.
Create our billboard backing layer
Create a new layer and call it backing.
Select the brush tool (make sure you load the vintage brush we downloaded earlier) and select vintage industrial 707, use the brush once to create our image using black.

You may need to resize the image created by this brush but that's okay.

Create a duplicate layer just beneath this layer and fill it with white, Press CTRL E to merge the two layers together.
Step 4:
Create our billboard image. Create a new layer called content below the billboard frame, use the magic wand tool to create a selection of the inside of the billboard frame, select the content layer and fill it with #e4d0b8


While still on the content layer, select the brush tool and grab the vintage 564 brush, change the color to #760b14 and use the brush to create our coke image.


Select the brush tool, making sure black is selected. Goto the brush pallette load our torn paper brush. Select one of the rumbled brushes from the bottom of the list and add some texture to our content layer. (It will help if you CTRL Click on the layer thumbnail first to contain the brush to just the content layer)


Select the eraser tool, changing the standard brush to one of torn brushes. I like brush 292, 140 and 62.
Use this eraser to add some age to our content layer, once your happy, add a drop shadow to the layer.

Step 5:
Create a new document 1200 X 800 at 300 DPI and import the lamp image we downloaded earlier.
Isolate the lamp from the white background. The magic wand works well for this, I found it worked best if I dropped the standard tolerance from 32 to 23.

Cut the lamp into two separate layers, the lamp hood and the arm.

We are going to use the Repousse tool to create our lamp, So CTRL Click on the lamp hood layer to create a selection and fill it with a plain white.

Apply the above setting's to your selection.

I found it helpful to rotate the image to see where the the x angle meets.

To create the metal look Apply the following setting's. Make sure to
load Default (For Ray tracer) to your list to see the Metal Steel material.
Adjust the image using the 3D tools

Next we'll do the same thing for the arm of our lamp.
Rotate the arm so it's facing you and apply these setting's

Next we need to reconnect our two parts. To help us to get the right perspective, import the two layers to our working image image. Use the 3D tools to adjust the arm and hood into the right position.

Once your happy with the position, right click on the layers and select Rasterize 3D, then merge the two layers together. You'll get this really rough edge when you do this so
I used and eraser with a hardness of about 90% to smooth the edges.
Then duplicated the layers, on the 3rd duplicate on the far left, flip it horizontally.

Lastly, we need to add some character to our lamps. We'll use the same blue rust we used for the billboard frame. I used the rectangle marquee tool to makes some random selections from my frame but you could just as easily import another image.

CTRL Click on the each lamp layer thumbnail to create a selection of the lamps, inverse the selection and delete the excess rust.

Change the blending mode of the rust layer to Linear Burn

You should have something like this

Create a folder and place all the lamp assest into it. Then duplicate the folder and merge down, CRTL E. CRTL Click on the layer thumbnail to create a selection and fill the selection with black.

Drop this new layer below the lamp folder and apply a fairly high gaussian blur, I used 34 pixels.
Move the blurred image so it's below the the lamps. Then duplicate the layer, drop the opacity to 50% and press CTRL E to merge the two shadow layers together. The blurred image will be visible outside our bill board but that's okay, the next step we'll take of that.

CTRL Click on the thumbnail of the billboard frame layer to create a selection, press CTRL I to inverse the selection. Select the shadow layers we just created and use the eraser tool to erase the excess shadow that was created.

Step 6:
To create the lights, we are going to use the path tool. Create a path in the shape of a light bulb.
To create the lights, we are going to use the path tool. Create a path in the shape of a light bulb.

Goto the paths tab and click on the circle of dots, to change the path into a selection.

Goto the Select Menu, Modify, Feather to soften the selection. Feather the selection by 25 pixels.

Create a new layer below our lamp folder and call this layer lights. Fill the selection with a white to transparent gradient.

Duplicate this layer two more time and move them so they align with the other fixtures, drop the opacity to 70%.

Next create a new layer just below the lamp layers and using a white soft brush draw a thin white line just underneath the lamps hood. Don't worry about perfection just get a nice visible line of white.

Use an eraser to clean up the excess around the sides.

Step 7:
Last step and you'r done.
Import the field landscape you downloaded earlier and move it onto our working image as the bottom layer. Create a new folder and drag all the billboard layers into this new folder except our landscape layer.

Select the legs layer, grab the eraser tool and select a grass brush. If you don't have one there are a number of brushes you can find online for free.
Use the eraser to blend the legs of the bill board into the scene.

Now we want to create a shadow of our billboard.
Duplicate the folder that contains the billboard layers, turn off the duplicated lamp layers, then press CTRL E to merge them together, CTRL Click on the the layers thumbnail and fill it with black, apply a Gaussian blur of 98 pixels and drop the opacity of the layer to 50%.
Use the distort tool to drop the layer to the ground

Lastly, use the Curves tool to adjust the landscape scene to look more dusk than daytime.

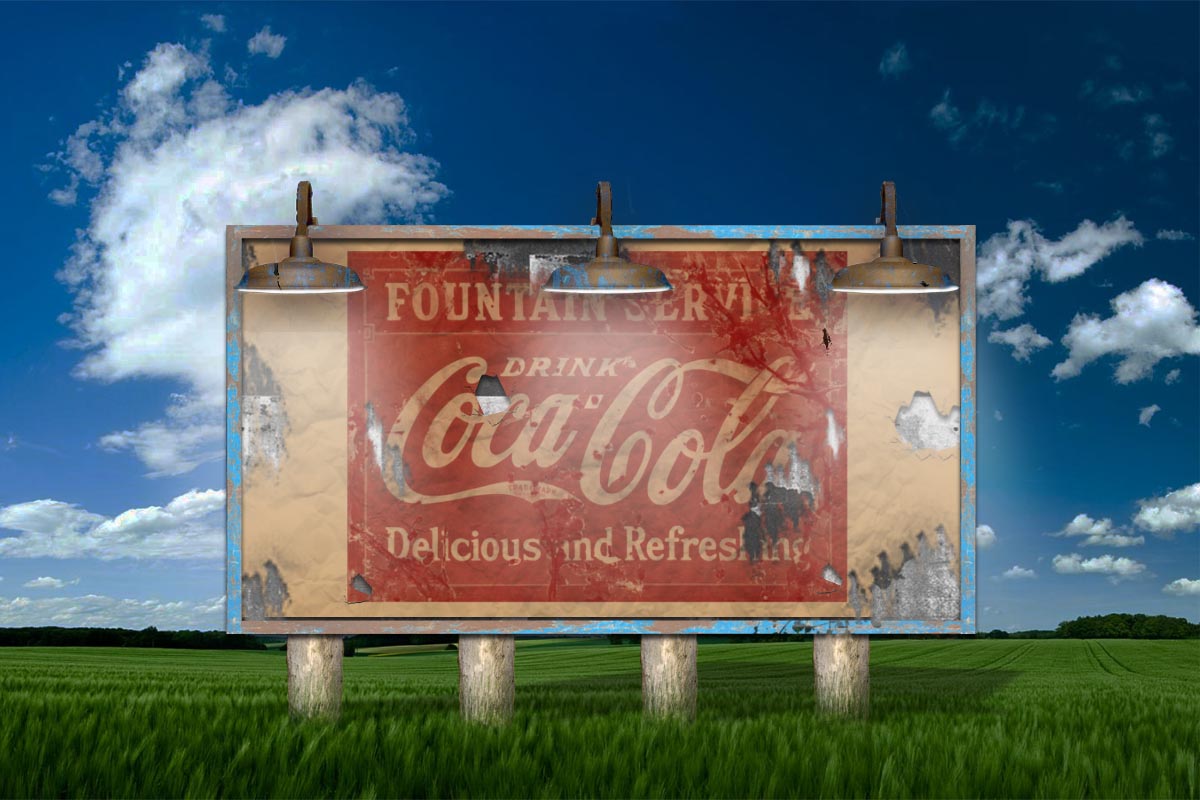
That's it your done!
Congratulations
Congratulations

Nathan White
No comments:
Post a Comment